Ultrasonics
Inspection
NDT
The Critical Role of
in Advancing Additive Manufacturing
Ultrasound
For Industrial Applications
Inspection plays a critical role during all phases of product development and implementation, making UT methods an enabling technology for new AM applications.
By Deborah Hopkins
The rapid increase in the use and interest in additive manufacturing (AM) is well documented and spans both the public and private sectors. Although AM already plays a significant role in product design and prototyping, advancing the methodology for industrial applications depends on reliable inspection technology, particularly for safety-critical parts and structures.
The increasing use and interest in AM for industrial applications is being driven by potential benefits that include the possibility to customize parts and reduce weight. For most AM products, however, there is usually little experience with how these structures perform in practice versus their conventional counterparts. This uncertainty for both manufacturing and in-service monitoring creates barriers that impede adoption of AM for manufacturing applications and challenges for in-service monitoring. Overcoming these barriers requires rigorous testing under realistic conditions. Inspection methods such as computed tomography (CT) are used, particularly during development stages, but most are impractical or too expensive for large-scale industrial manufacturing compared to ultrasonic (UT) methods.
Inspection plays a critical role during all phases of product development and implementation, making UT methods an enabling technology for new AM applications. Although UT methods are routinely used for inspection of traditional materials and structures, AM creates significant new challenges. UT’s roles include material evaluation, testing of structures under development, in-service evaluation and long-term monitoring. During the development phase, new materials must be thoroughly evaluated for material homogeneity, porosity, ease of use and any other properties that could affect strength or longevity. Critical structural testing must include evaluation of joints under realistic loading conditions, including identification of potential flaws and defects. In-use and long-term monitoring must be able to identify not only flaws and defects, but also material degradation that could affect performance and/or lead to initiation of defects.
Some of the challenges in developing AM inspection protocols is the wide range of materials used combined with the large number of production methods in use and under development. Each material and inspection method must be fully understood and tested, together with their interaction with processing variables. A critical element of the testing is detection and analysis of the flaws and defects encountered. Sophisticated modeling and simulation tools have an essential role to play, but the complexity of AM processes along with the large number of process parameters and production variables significantly increases the modeling challenge.
Developing new AM applications for metals and composites requires both research and experience to determine best practices, including exploration of potential feedstock materials and processing methods. This can, however, be a significant challenge given issues that complicate both metrology and inspection1. To provide the vital information that industry needs requires detailed knowledge of feedstock materials, metallurgical behavior, manufacturing processes, microstructures and material properties, as well as the relationship between these factors2.
Production methods in use or under study include direct-energy deposition; electron-beam methods; laser energy; and wire-arc melting. Balasubramanian and Senthilkumar report that it is currently possible to reliably manufacture dense parts with certain AM processes for many materials including steels; aluminum and titanium alloys; super alloys; metal-based composites; and ceramic-matrix composites3.
Composite materials present unique challenges for ultrasonic inspection that arise from layered materials, complex shapes, rough surfaces, part-to-part variability, and a wide range of potential flaws and defects. The pictures displayed in Figure 1 are examples that illustrate the diverse range of shapes, thicknesses, surface conditions, and part variability encountered in production of traditional composite parts. AM of similar parts will face the same challenges.
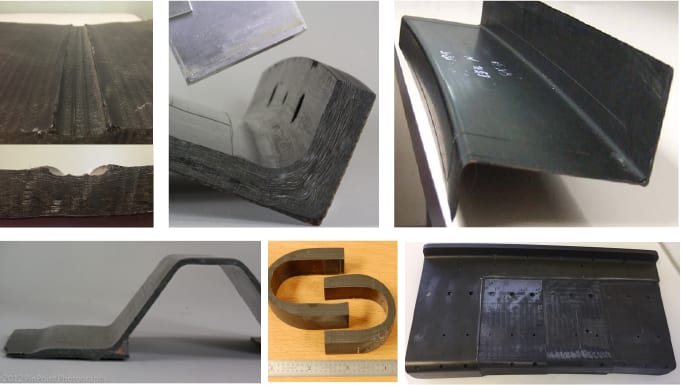
Figure 1. Examples of industrial composite parts produced with conventional manufacturing technology versus AM. Photographs courtesy of Michel Brassard, TD NDE and BERCLI R&D.
Developing reliable inspection methods is crucial for greater use of AM for metals. Production methods in use or under study include direct-energy deposition; electron-beam methods; laser energy; and wire-arc melting. One of the most widely used technologies to additively build 3D metal parts is powder-based fusion (PDF). The PDF process uses a laser or an electron beam to sinter, melt and fuse the powder particles as it traces the part. Other technologies that operate on this principle include Selective Laser Melting (SLM), Electron Beam Melting (EBM), Selective Heat Sintering (SHS), Selective Laser Sintering (SLS) and Direct Metal Laser Sintering (DMLS).
A complex part produced by Xometry from an aluminum alloy is shown in Figure 2. The pump-manifold housing was printed by DMSL, in contrast to investment casting that would typically be used. In this case, the benefits of AM include a reduction in the lead time of six weeks and a higher density than casting. The increased density is particularly significant because it means that no secondary sealing is required in the channels4.
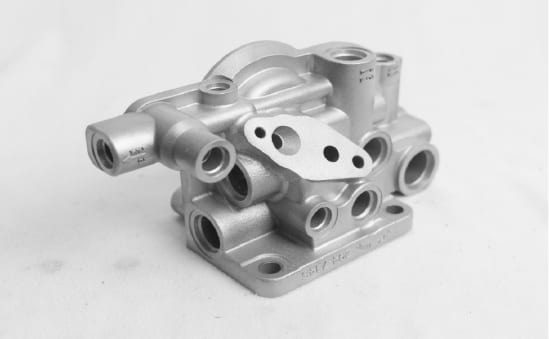
Figure 2. 3D-printed pump manifold made by Xometry from an aluminum alloy by direct-metal-laser sintering (DMLS). Photograph courtesy of Xometry.
Terry Wohlers reports that ensuring quality for metal PDF requires removing any remaining powder; cutting and grinding away support structures; controlling process drift and thermal distortion; and going through a stress-relief heating cycle5. Additional steps usually include CNC machining and other finishing work. According to Wohlers, most post-processing operations today are manual and often require skilled operators making automation extremely compelling6.
Wire-arc additive manufacturing (WAAM) is one of the oldest and most advanced methods for AM of metals. It is attractive for many industrial applications because it has been shown to be economically and technically feasible for large metal parts with sufficiently low complexity. WAAM processes build up parts through the deposition of weld beads with the downside that most resulting parts have rough surface finishes and require post processing7.
Another issue with WAAM is the potential for uneven heating and/or excessive heat buildup that can result in remelting in lower layers. Research has also shown that the lead angle of the welding torch is another factor that can affect the uniformity of the deposited track8.
WAAM is possible with many different materials, but aluminum is of particular interest because of its light weight, resistance to corrosion and the ability to customize and fabricate large parts. Optimization of WAAM is an active area of research that includes evaluation of the effects of different methods and process variables on mechanical properties and residual stress.
As described above, one of the challenges in developing inspection methods for AM is the large number of processing technologies in use or under development. UT techniques can go a long way toward addressing some of these challenges. Phased-array technology has tremendous advantages over conventional UT for many autonomous and in-service applications because of the ability to perform electronic focusing, scanning, and beam steering. These features can significantly reduce inspection times and costs, while improving the accuracy of the measurements.
One of the latest advancements in phased-array technology is surface-adaptive acquisition, in which the shape of the structure is measured as part of the inspection, allowing focal laws to be applied in software to adjust the ultrasonic beam to account for the shape of the part and optimize the beam at each measurement location.
Surface-adaptive technology contributes to cost reductions by lessening positioning sensitivity and thus labor costs, while alleviating the problems of complex geometry and part-to-part variability. The technology is extremely well suited to automation, which increases inspection speeds, while minimizing inspection times and the expenses associated with part handling. Because surface-adaptive techniques also optimize the UT beam position, it improves the accuracy of defect detection and sizing9. It also reduces or eliminates the need for multiple probes, while also enabling the use of flat matrix arrays rather than expensive shaped probes. Probe costs are further reduced because shaped arrays are limited to parts with the same curvature.
For more than a decade, fully automated surface-adaptive UT has been successfully used for inspection of aerospace structures made from aluminum and composite materials10. The remaining challenges include adapting UT techniques as necessary to meet the challenges posed by AM, while also meeting requirements for speed, accuracy, defect detection and ease of use.
These requirements have been met for inspection of conventional composite parts at aerospace facilities. Figure 3 shows a fully automated inspection station that integrates a phased-array probe and surface-adaptive acquisition (left-hand photograph) with a vision system, part handling robots, scanners and all necessary equipment (left-hand schematic drawing) to allow inspection of a wide variety of composite parts.
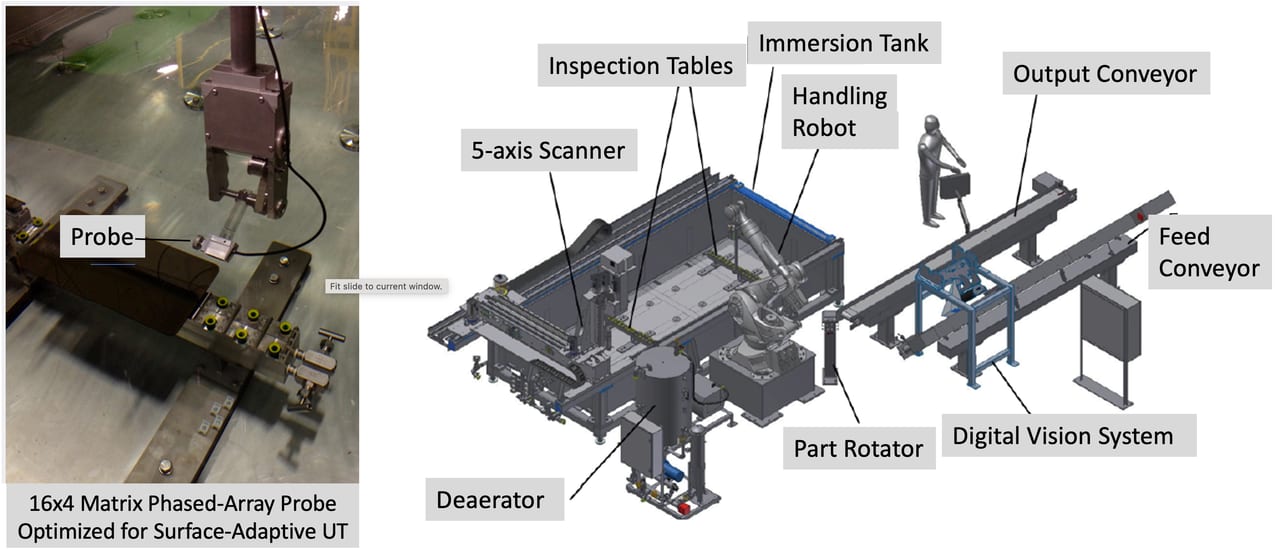
Figure 3. Versatile fully automated inspection station that integrates a phased-array probe and surface-adaptive acquisition (left-hand photograph) with a vision system and robotics (left-hand schematic drawing) to allow inspection of a wide variety of composite parts. Photograph and drawing courtesy of Michel Brassard, TD NDE.
Figure 4 shows an industrial composite part with a flat section at the top that curves downward to another relatively flat section. The part contained embedded defects in the radius and was inspected with a matrix array, both with and without surface-adaptive acquisition. The close-up phased-array images shown in the figure are for the flat section at the top of the part and the adjoining radius. The first two images were obtained without using surface-adaptive acquisition and the results were unacceptable because of the dark areas and failure to clearly image the defects. As is visible in the two bottom images, surface-adaptive acquisition provided improved resolution and acceptable defect identification.
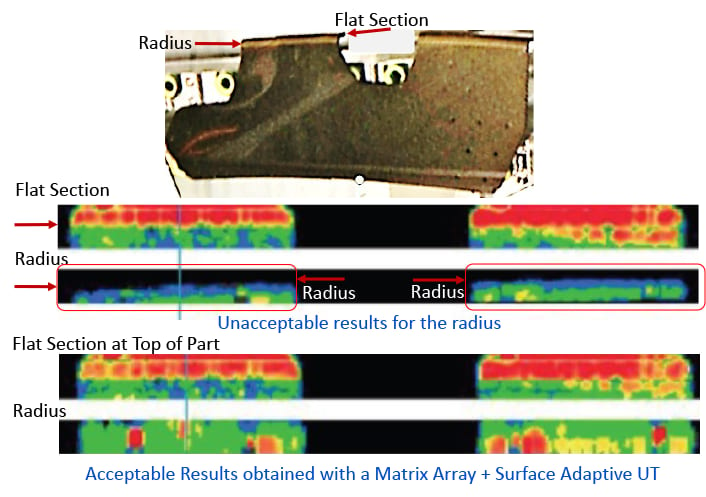
Figure 4. Photograph of an industrial composite part with artificial defects embedded in the radius. The following phased-array images of the flat section at the top of the part and the radius show the results without (top images) and with (bottom images) the use of surface-adaptive UT scanning. Photograph and images courtesy of Michel Brassard, TD NDE and BERCLI R&D.
As described above, a challenge with WAAM that hampers adoption of wire-arc methods the is the resulting surface roughness. In most cases, smoothing the surface is cost and time prohibitive. Recent research examined the feasibility of using phased-array UT to inspect aluminum specimens with varying degrees of roughness11. Simulations confirmed with experimental results showed that phased-array UT was able to detect and characterize defects, including their size, morphology and location for a maximum of 89.6 μm average “waviness.” Defects ranging from 2 to 5 mm were characterized in size and depth. In addition, the experimental results were consistent with simulations. These preliminary results represent an essential step for the development of an NDT system for inspecting WAAM parts.
To reach their full potential in existing and new markets including aerospace, defense and manufacturing, AM inspection methods must be able to ensure quality. The bottom line is that inspection has a critical role to play during all phases of product development, implementation and long-term monitoring. A tremendous advantage of the UT techniques described here is that they improve overall production efficiency by permitting real-time inspection, analysis, and data visualization. Maximum efficiency is achieved when the lessons learned can be used to develop protocols across key industries. For inspection to be viable for new applications it must be cost effective. That argues for minimizing post processing and integrating inspection with other processing steps. The ultimate goal is to fully understand and characterize the types of flaws and defects that occur, the conditions that lead to imperfections, and their impact on quality over the lifespan of the product.
1 T. Wohler, https://wohlersassociates.com.
2 V. Senthilkumar, C. Velmurugan, K. R. Balasubramanian and M. Kumaran, Additive Manufacturing of Multi-Material and Composite Parts, Additive Manufacturing Applications for Metals and Composites, 2020, https://www.igi-global.com/chapter/additive-manufacturing-of-multi-material-and-composite-parts/258181.
3 https://make.3dexperience.3ds.com/processes/powder-bed-fusion
5 T. Wohler, https://wohlersassociates.com.
7 Precision Metal Additive Manufacturing, R. Leach and S. Carmignato eds., CRC Press, 2020.
8 T. Hauser, A. Da Silva, R.T. Reisch, J. Volpp, T. Kamps, A. F.H. Kaplan, Fluctuation Effects in Wire Arc Additive Manufacturing of Aluminum Analsed by
High-Speed Imaging, J. of Manufacturing Process, V. 56, Part A, 2020, pp. 1088-1098, https://doi.org/10.1016/j.jmapro.2020.05.03 .
9 D. Hopkins, M. Datuin, M. Brassard, Challenges and Solutions for Ultrasonic Phased-Array Inspection of Polymer-Matrix Composites at Production Rates, AIPConference Proceedings, 2019, 2102 100002 10.1063/1.5099830.2.
10 M. Brassard, D. Hopkins, and J. N. Noiret, Robotics and Surface-Adaptive Ultrasound for Fully Automated Inspection of Composites, JEC CompositesMagazine, 50(83:68-73, 2013.
11 A. Lopez, R. Bacelar, I. Pires, T. G. Santos, J. P. Sousa and L. Quintino, Non-Destructive Testing Application of Radiography and Ultrasound for Wire and Arc Additive
Manufacturing, Additive Manufacturing, 21, 298-306, Science Direct, 2018, www.elsevier.com/lo cate/addma.
Ian R. Lazarus is president and CEO of Creato Performance Solutions, providing leadership development, training, and solutions to support operational excellence.
Jim L. Smith has more than 45 years of industry experience in operations, engineering, research & development and quality management.

Scroll Down
Scroll Down
