Test & INspection
As technology continues to evolve, it will take a lot of work from the standards community to help the industry keep pace with new tools for new manufacturing methods. By Scott Ledger
Measurement and Inspection
Standards
When it comes to the creation of measurement and inspection standards, it’s a multifaceted process.
The standards themselves are established and written by the American Society of Mechanical Engineers, but then published and sold by the American National Standards Institute (ANSI). In particular, the H213 Special Committee comprised of Dimensional and Geometrical Product Specifications and Verification experts.
This includes representatives from other standards—including metrology standards—as well as Geometric Dimensioning and Tolerancing (GD&T) standards Y14.5 and Y14.100, B89 metrology structure and standards, under which most form standards fall except the B46.1 standard for surface texture (roughness, waviness and lay).
The Process of Updating Standards
Measurement and inspection standards are traditionally updated on a regular schedule. However, the form measurement standard for out of roundness, B89.3.1, has not been updated since its initial release in 1972, and is no longer an active standard available through ANSI (though it can be purchased directly from ASME). However, the standard has been reaffirmed several times over the course of those decades. This means it has been committee reviewed and deemed current and valid, with no need for revision.
As new measurement technologies continue to evolve, debate does exist as to whether old standards will finally require new updates. And, as we move forward, some growing pains will naturally occur. This has been the case as the B89 standards committee attempts to update the standard around the use of filters, revising it from just describing a filter to making suggestions regarding what filters should be used under certain conditions.
The Y14 standards committee disagrees with this proposed change. Filters are mathematical functions used to isolate wavelength content within a measurement. If a measurement is taken with a roundness gage and has form errors, those errors can be broken down into smaller components comprised of sine waves. The filters then decide which sine waves truly point to out of roundness issues that will affect function, and which indicate issues with roughness. The Y14 standards committee contends that all points on a surface represent the form of that surface, including surface texture, making the B89.3.1 standards committee’s proposed update unnecessary. To date, this standard remains unchanged.
However, there are standards that have been kept more up-to-date, like the B46.1 surface texture standard that is on a five-year update schedule. Appendices have been regularly added with new descriptive and prescriptive approaches to evaluating surface texture. A major update is on the horizon, aimed at reorganizing the standard so that it reads in a more linear way in the wake of all these additions.
Why Standards Changes Remain Challenging
Technology plays a large role in standards changes. For example, the capability of current computers allows for faster processing of measurement data, leading to new options for taking measurements that eventually make it into the standards.
However, the update process remains challenging because, in the United States, those on standards committees are volunteers. For this reason, it’s important to maintain a balance in terms of where committee members come from and where their interests lie. This means a mix of manufacturers, users, and representatives from academia or consulting. Of all these member groups, metrology committees, in particular, struggle with keeping manufacturers and users involved or interested. This creates an imbalance of influence on a standards committee, which means updates are slow to move forward.
Even with a balanced committee, however, the need to review and comment multiple times means the process is still slow. Especially when you consider the committees are made up of volunteers doing it all on their own time. And, when you also consider that U.S. standards are not well supported by government, unlike countries involved in ISO standards where many committee members are publicly supported for their participation.

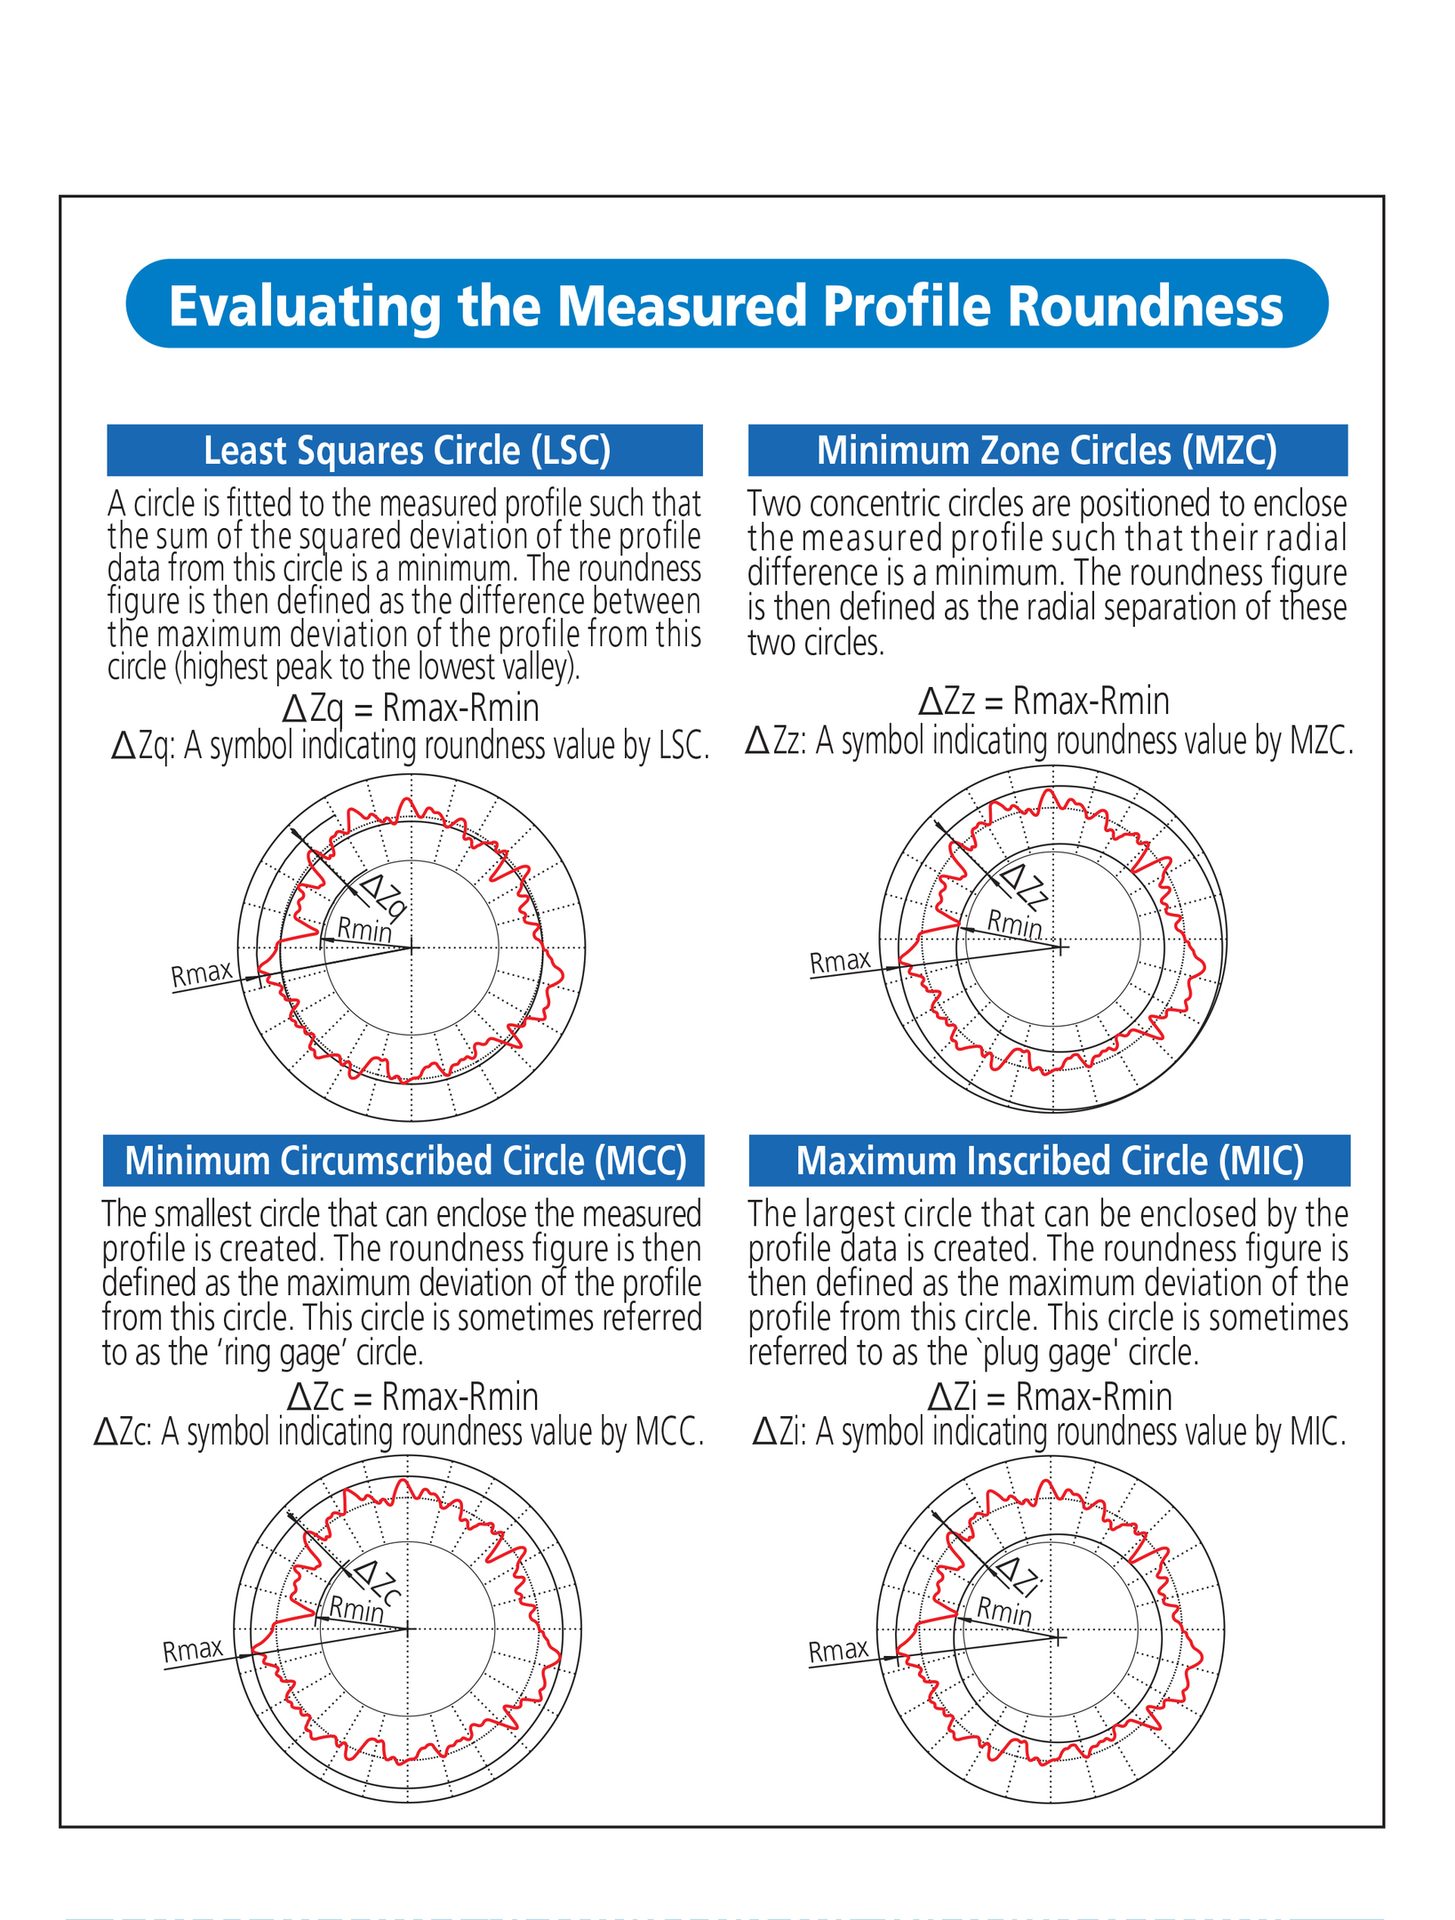
Roundness testers use the measurement data to generate reference circles, which dimensions define the roundness value. There are four methods of generating these circles, as shown, and each method has individual characteristics so the method that best matches the function of the workpiece should be chosen. Each method results in a different center position for the reference circles and therefore affects the axial location of the circular feature measured.
Amassing Feedback to Change Standards
In lieu of committee participation, you sometimes must get creative in soliciting metrology standards feedback from users.
For instance, the B46.1 committee has hosted free seminars where attendees are encouraged to share suggestions with committee members during post-event open discussions. These are truly some of the best forums to gather input from the users of the standard. It’s contributed to the planned major B46.1 reorganization—users stated that, in its current state, it’s hard to read, with too many sections to toggle between.
In addition to garnering feedback about existing standards, there are measurement categories for which there are not currently standards but likely will be in the future, like cylindricity, straightness, and flatness (currently the Y14 standard is the closest that applies). In addition, there may be standards from specific applications, such as SME on sealing surfaces, that address form requirements related to them.
And then there’s the case where a disruptive technology like additive manufacturing enters the mix, and it forces committees to reevaluate how it impacts metrology and GD&T from a standards perspective. A situation like this accelerates standards changes, though still not as quickly as would be ideal.
U.S. Standards vs. ISO Standards
In general, U.S measurement and inspection standards do not significantly differ from ISO standards. So, the question becomes: why do we keep U.S. standards instead of adopting ISO standards? One reason is ISO standards’ complexity.
As an example, for surface texture, there isn’t one single ISO standard that covers the same scope as ASME B46.1—there are instead many different standards. Every aspect of surface texture, from parameters to filters to instrument types, has its own standard. To amass enough information to correctly address surface texture, every standard pertaining to surface texture would have to be purchased separately and then reconciled on the back end.
Conversely, with the U.S. B46.1 standard for surface texture, all aspects that pertain to surface texture measurement are included in one document under one standard. This simplifies the process and is one reason we continue to maintain U.S. standards.

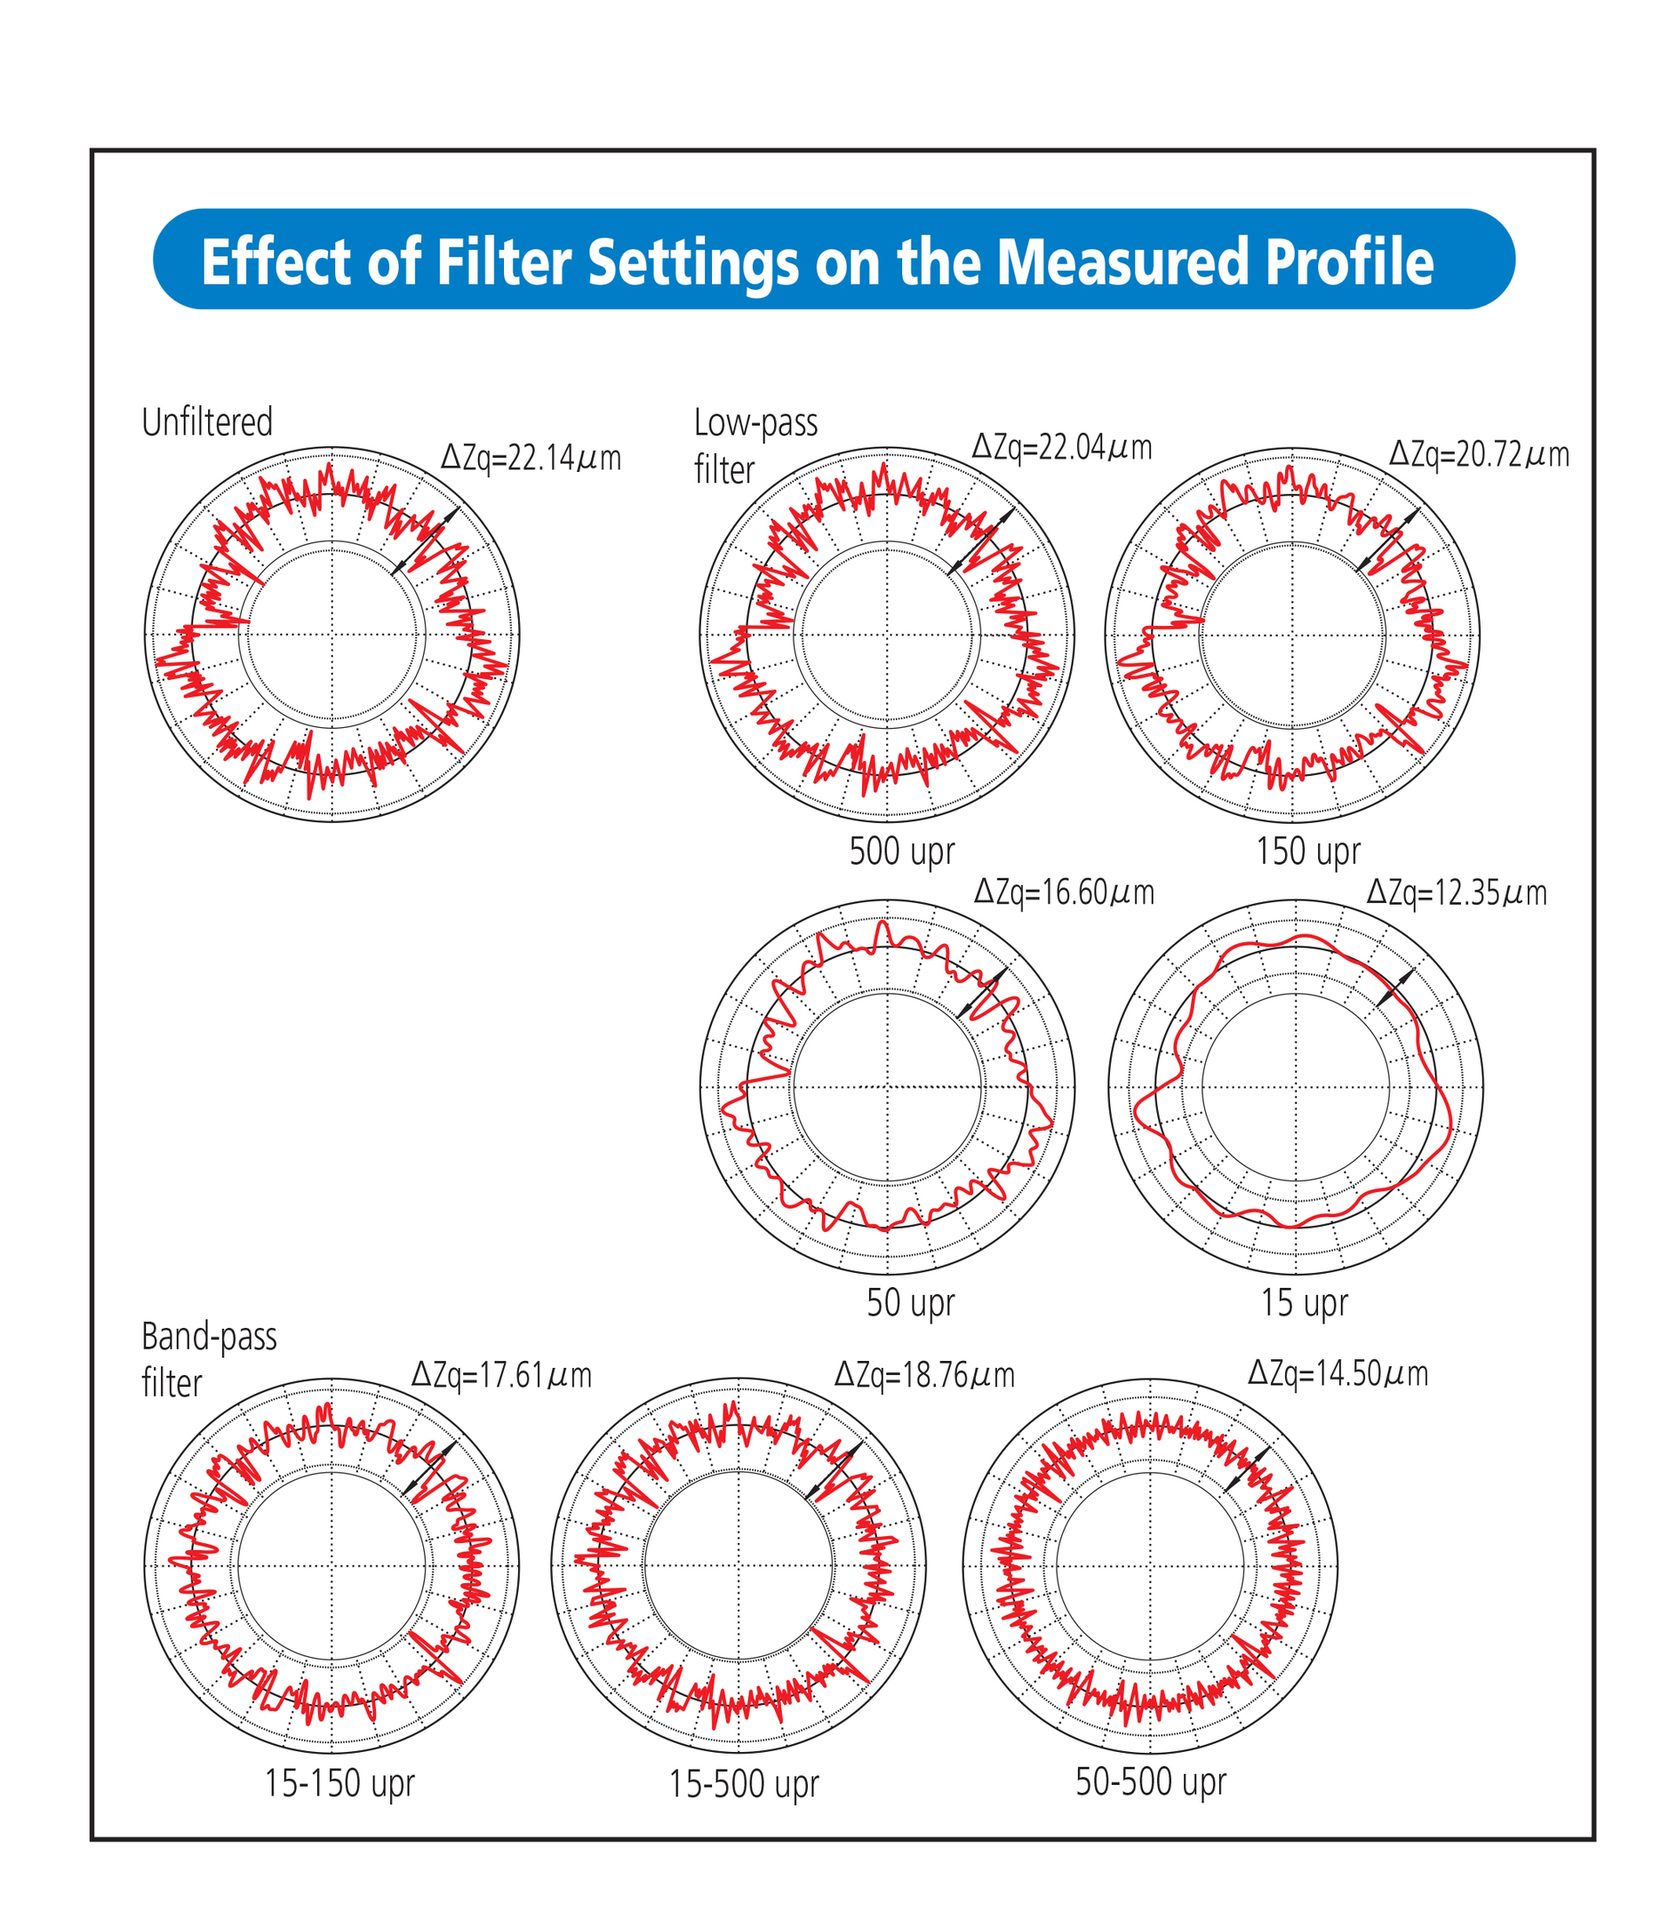
Profiles can be filtered in various ways to reduce or eliminate unwanted detail, with a cut-off value set in terms of undulations per revolution (upr). The effect of different upr settings is shown in the diagrams, which illustrate how the measured roundness value decreases as lower upr settings progressively smooth out the line.
Key Takeaways
In terms of our existing inspection and measurement standards, though they may not evolve as quickly as other areas of the manufacturing process, they are still applicable and valuable. Take the “old” roundness standard we still follow—if someone conducts measurements of this critical characteristic based on the standard in place, they will likely adequately assess the quality of that feature on a part.
Standards like Y14 exist as a common language we all speak, so that when a call is put out on a drawing, everyone reading the drawing understands what that means, thereby enabling commerce activities. Metrology standards also establish common terminology and practices. For example, the B89 standards for CMMs have a section on how to evaluate if the CMM is capable of making the measurement you’re asking it to make. There is another section pertaining to uncertainty that describes how to approach looking at an uncertainty and how you would compare that to the tolerance you’re trying to maintain. These are useful tools for manufacturing in both the U.S. and worldwide, and especially for the U.S. supply chain.
But keep in mind that the goal of standards is to set general rules for a typical industry approach. They aren’t set-in-stone rules. There will always be cases where a particular manufacturer decides to take its own proprietary approach, particularly for form measurements where measurement results are mathematically generated. The standards themselves provide a foundation to start from.
As technology and advancements continue to quickly evolve, it will take a lot of work from the standards community to help the industry keep pace with, and use, new tools for new manufacturing methods. Especially as manufacturers continue embracing proprietary approaches that give them a competitive advantage, but which would be disadvantageous to freely share with the standards community. In the end, it will take greater user participation on standards committees to help ensure standards can be written and updated as fast as modern methods demand.
