H2 Deck By Bold Name
h2 xxxxxx
H1 xxxxxx
h2 xxxxx

Integration of the latest artificial intelligence technologies enable even deeper insights. By Kyle Crosby
Overcoming Quality Challenges Using
AI-Powered Connected Microscopy
Software & Analysis
H2 Deck Info By Paragraph Style Bold
Headline
Industrial microscopy solutions offer a wide range of utility for manufacturing and assembly applications, including incoming goods inspection, component quality control and device failure analysis. These tasks are common across the electronics, automotive, aerospace, medical equipment and alternative energy sectors, wherein instrumentation can be found in all types of production environments.
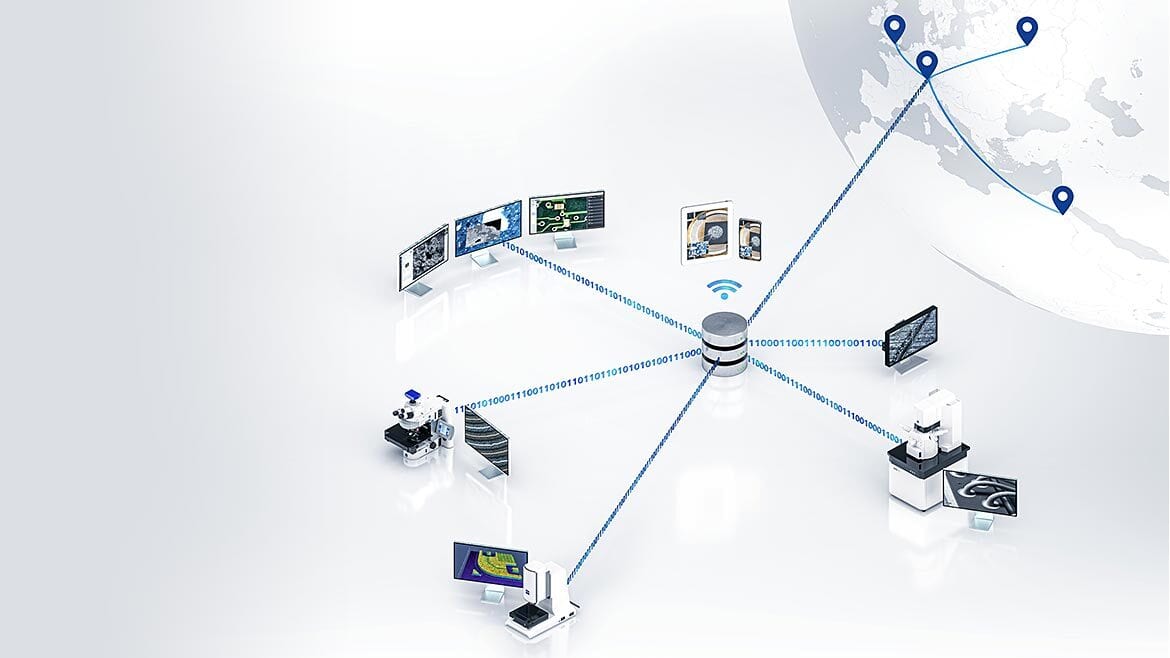
Such characterization tools allow users to gain understanding and generate actionable results. These results can be enhanced by connecting imaging and analytics data between systems, laboratories, and sites in a correlative and contextual fashion.
Integration of the latest artificial intelligence (AI) technologies enable even deeper insights. Users achieve more reliable interpretation of complex information in less time while boosting productivity and reproducibility.

This software provides the infrastructure for connected laboratory environments, with technical cleanliness analysis, automation, GxP and more.
Connected Microscopy Opens Up New Quality Assurance Possibilities
Whether using stereo microscopes for routine optical inspection, or electron microscopes with chemical spectroscopy for advanced technical cleanliness analysis (TCA), connected microscopy provides a powerful framework for quality assurance. Operators gain a whole that is greater than the sum of its parts.
Unique advantages of connected microscopy include obtaining, managing and utilizing microscopy data consistently. This data can be utilized across multiuser environments and multiple departments and from a variety of modalities, including:
- Light microscopes (LM)
- Scanning electron microscopes (SEM)
- X-ray microscopes (XRM)
The ability to leverage a robust connected software suite accelerates the quality lab. Operator bias is reduced, and visibility is increased among functional groups. This synergy facilitates analyzing of trends and reporting of results in real time, with less ambiguity.
Reduced redundancy in the evaluation of material structure allows for efficiency gains in the research and development and process improvement cycles. As well, properties and associated performance of the final product in a profitable manner are ensured.
Disruptive computing strategies offer new possibilities, even for analysis of old data. A shared data infrastructure is also incorporated where experimental results are captured and reported in a universal fashion, with traceability and security intact.
A connected microscopy software suite can enable:
Separation of Image Acquisition and Analysis
In addition to the front-end acquisition of data, there are many downstream processes driven by the microscopy lab which help guide future decision making. Measurement of dimensions, segmentation of phases, classification of contaminations, isolation of faults, etc. can illuminate where process improvements are required. These measurements must be done with a high level of efficiency and consistency.
Connected microscopy ecosystems allow users to “outsource” the non-acquisition tasks and free up the microscope for the more resource consuming data generation tasks. This outsourcing can tremendously increase the net productivity of the instruments, further optimizing return on investment for capital equipment.

The ability to leverage a robust connected software suite accelerates the quality lab.
Correlative Workflows
All the data collected on a specimen, including the segmentation and analysis tools deployed to interrogate results, can be linked together using correlative microscopy. Methods for understanding multi-modal data, especially at multiple length scales, require careful consideration of data formats and coordinate systems for proper visualization with accurate orientation and scaling.
In this way, users gain the ability to inspect specific regions of interest in greater detail, while maintaining the context of the whole component in an intuitive fashion. Correlative microscopy’s more complete perspective allows users to tease out minor details that may otherwise be overlooked in data collected from a single source.
Ease of Use and Automation
Traditionally, microscope operators have required extensive training and deep collective knowledge of best practices to achieve proficiency for a given task. Today, systems are much more simplified to interact with, including many fully automated solutions that are operator independent and incredibly reliable.
Nearly all aspects of a microscopy workflow — from specimen loading, hardware alignment, experimental parameter set up to data analysis recipes — can take advantage of modern innovations such as robotics handling, self-tuning capabilities, guided click sequence-based job modes and batch processing toolkits. Now even inexperienced users can achieve high quality results with minimal instruction. This paradigm shift makes advanced microscopy techniques approachable for a larger constituent than ever before.

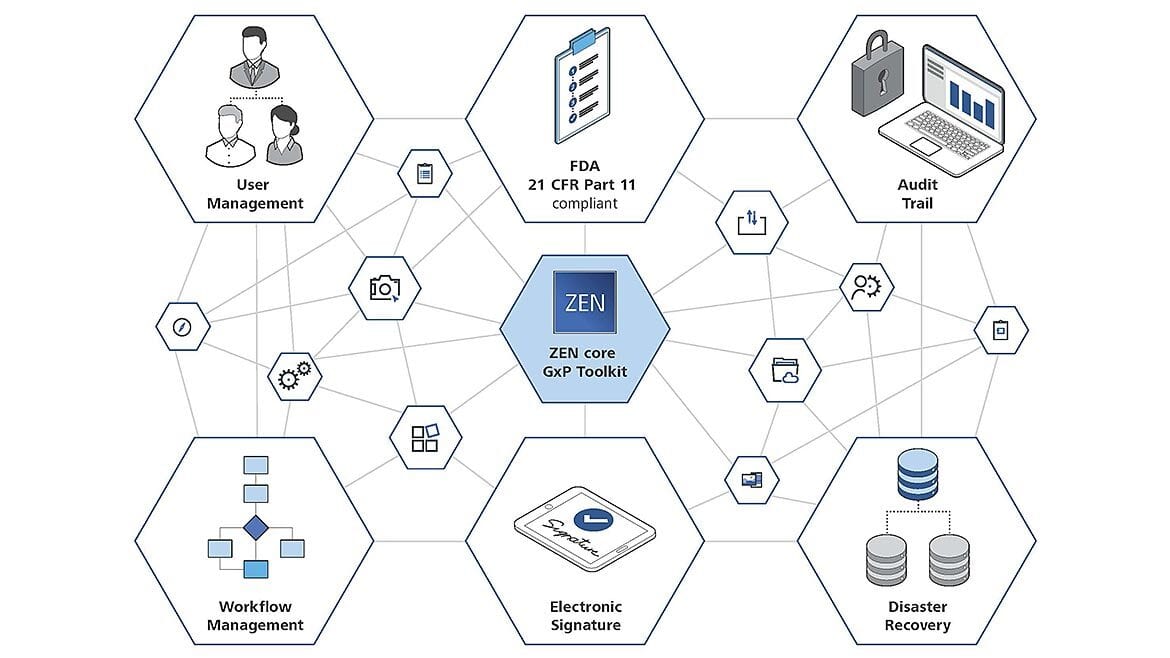
Users can utilize ZEISS ZEN core’s GxP Toolkit to realize traceable microscopy workflows.
AI
Artificial intelligence technologies offer enormous potential for microscopy in terms of augmenting or supplementing human involvement in the characterization process. This promise allows users the opportunity to not only generate more reliable data in future experiments but also to reanalyze existing data sets for additional insight with minimal effort. Machine learning (ML) methods, including the use of neural networks, continue to evolve in their breadth of utility and ease of use without the need for high performance computing resources.
Good Practice Guidelines
Incorrect reporting or even falsification of data can be destructive to a manufacturer’s reputation and may even severely damage a company’s bottom line. Consequently, internationally recognized quality standards, such as those defined by ASTM, ISO, VDA, NORSOK, SAF and DIN, are increasingly critical in competitive globalized markets. In regulated industries such as pharma or medical, standards such as FDA 21 CFR Part 11 need to be fulfilled.
Connected microscopy in regulated industries can help to ensure the validity of quality department results through application of Generic Good Practice (GxP) principles. These principles include release procedures of workflows including 4 eyes principles, protection from manipulation of results through preservation of metadata (Electronic Signatures) and clear audit traceable electronic records of all actions taken in the collection and analysis of microscope data (Audit Trial).

ZEISS ZEN core's benefits for battery inspection include a configurable user interface that provides seamless control of different microscopes and cameras in uniform fashion while performing data acquisition, analysis and reporting.
The Right Software for the Right Application
Connected microscopy’s combination of LM, SEM and XRM delivers efficient and accurate data when amplified by the right software suite. A modular connected microscopy software suite can provide a unified user interface for microscopes and cameras.
There are specific modules that make a software ideal for several applications, including battery inspection.
Battery Inspection
Quality inspection techniques for batteries must bridge nanoscale to macroscale analysis where mechanical, thermal and electrochemical forces should be considered holistically. A successful battery inspection includes:
- Strict control of the raw materials integrated at the electrode and separator level
- Stringent monitoring of the calendaring and cutting processes
- Thorough assessment of cell assemblies that eventually go into the powertrain of a new energy vehicle (NEV)
Connected microscopy can determine if battery materials and their higher-level device integration will meet the demands of the consumer environment by combining the strengths of different techniques in a unified manner. Integration of high-resolution SEM along with high throughput nondestructive XRM data allows investigators to pinpoint nanoscale critical flaws and their relationship to the overall device performance from several different perspectives. This type of comprehensive analysis can be achieved using a smart data ecosystem combined with AI-powered analysis toolkits.
Conclusion
Microscopy software is your command center for connected laboratory environments. With an AI-infused, user-friendly software suite you’ll be able to obtain maximum meaningful information from your parts or material samples and keep valuable data together across instruments, laboratories and locations.
